In the previous post we looked at options available for water meters and how to interface them with a Raspberry Pi. In this post we will delve into the details and go through the steps to make the actual connection to the meter and set up the software. We’ll push the water flow rate to Home Assistant using MQTT as well as the amount of water used in the last hour. In addition, we’ll run a small web page on the Pi to administer the meter. Let’s get started!
Prerequesites
I’m assuming that you have a Raspberry Pi (any model will do) that has a recent version of Raspbian installed (desktop not required) and that the Pi is connected to the internet. You should be able to access the Pi by an attached keyboard/monitor or through SSH. You should also have an instance of Home Assistant running on your network, but not on the Pi being used for the water meter. (That could slow down our metering.) In addition, you’ll need to know the IP address of your Pi meter. Ideally, you’ll have set a static IP so that it does not change if the Pi is powered off or rebooted. In the code that follows, we are using the default user “pi” and its home directory.
Connect The Meter
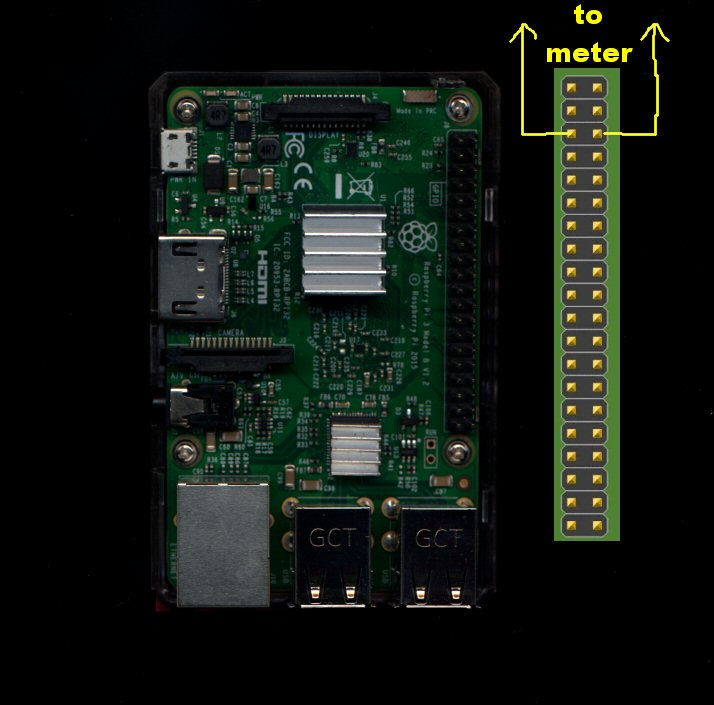
We will be using a water meter that outputs a pulse over two wires. See the previous post for more details. Connect one wire to GPIO 3 (which is also known as pin #5) and the other wire to pin #6 which is ground. It doesn’t matter which wire is which. Our software will make GPIO 3 an input that is normally pulled “high” and will count each time the meter pulls it to ground. If you don’t yet have a water meter but want to try this tutorial anyway, you can substitute a normally open momentary pushbutton for the meter. Every time you push the button, the system will assume another unit of water has flowed.
Note that although the Raspberry Pi can easily count pulses, for industrial or professional applications a microcontroller may be a better solution. A board such as an Arduino operates in real time and does not have the overhead of a Pi with its Linux-based operating system. When you need absolute precision and can’t miss even one pulse, don’t use a Pi. For our purposes and general household/light commercial metering, the Pi will be sufficient and easier to work with.
Set Up The Pi Software
I’ve created a public Git repository with most of the required software, including my custom Python code for counting the pulses and publishing them with MQTT, as well as the PHP web page for administering the meter.
Before we pull the code, we’ll need to install a few pieces of software. First, install Docker and Docker Compose using the following commands:
curl -sSL https://get.docker.com | sh

sudo apt install -y docker-compose
More commands to configure Docker to auto start and set permissions:
sudo systemctl enable docker

sudo systemctl start docker

sudo usermod -aG docker pi
(Docker is a containerization system that helps us keep various software running in isolation. You don’t need to understand Docker to run the meter, but I urge you to learn more about it here. Docker Compose is a system for organizing our containers.)
Next, install Git with the following command:
sudo apt install git
Now, we will clone the repository, effectively copying all of the files you will need from the repository onto your pi:
cd /home/pi/ git clone https://github.com/alanb128/pimeter.gitcd pimeter sudo chown -R www-data:pi /home/pi/pimetersudo chmod -R 770 /home/pi/pimeterWe should now have everything in place to start our containers and get the system running:
docker-compose up -dThis can take some time to start initially, so be patient.
Water Meter Settings
With the containers running, you should be able to browse to the configuration web page at <ip address>:4040 (for instance, if your meter address is 192.168.1.100, type this in your browser address bar: http://192.168.1.100:4040) You must be on the same network as the meter.
Interface With Home Assistant
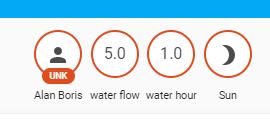
We are now publishing two MQTT topics for the water meter, “water/flow” and “water/last-hour” (you can change these on the configuration page if you want.)
To see this data in Home Assistant, we need to tell it the address of the MQTT broker, which is like the traffic cop for MQTT packets. If you don’t have a broker (or don’t know what one is) we have included one in the meter. In this case, change the meter configuration page “Broker IP address” to the IP address of your meter.
If you are running a separate broker, or using a cloud broker, both Home Assistant’s configuration.yaml mqtt entry and the meter configuration page need to point to the same address of the broker. You can find broker options on this page.
You’ll also need to add sensors for each of the MQTT topics we are publishing. Here is an example of how to configure this in Home Assistant’s configuration.yaml file:

Once the meter is publishing to the MQTT broker and Home Assistant is listening to the same broker, you should start to see the water meter data.
Additional Features
There are many ways you can extend the functionality of this meter. I’ve personally added email and text alerts when water use is sustained or excessively high. You can push the pulse data to a database such as InfluxDB for further analysis and reporting. It is also pretty easy to add your utility costs into this system for real-time monitoring of your anticipated water bill. Take a look at the watermeter.py code and start hacking!